Every Microsoft Partner has an Azure Optimisation guide they make available to customers. And if you took the time to read all of them, you’d see that there’s a good chance they all cover the same basics: Reservations, Right-Sizing, Stop/Start DevTest machines, etc. These are the staples of proper Azure optimisation, so there’s definitely value in reading and implementing their tips. In fact, you can check out our guide for more information on basics like:
- Assigning cloud costs to individual applications
- Analysing and right-sizing your resources
- Finding the Microsoft offers and discounts that suit you best
But since we’re committed to providing regular updates to our guidance – and because we know that many of our customers are beyond basic tips like these – we’ve put together these tips that go beyond the basics and are built-on analytics from our Service Desk team members who live and breathe Azure optimisation every day.
To make this guide as practical as possible, we looked back at the optimisations Codify has performed recently for customers. From that, we’ve identified the following eight tips that you too can use to further optimise your own Azure environment. We have ordered these tips based on the savings we have achieved for our customers, from highest to lowest savings.
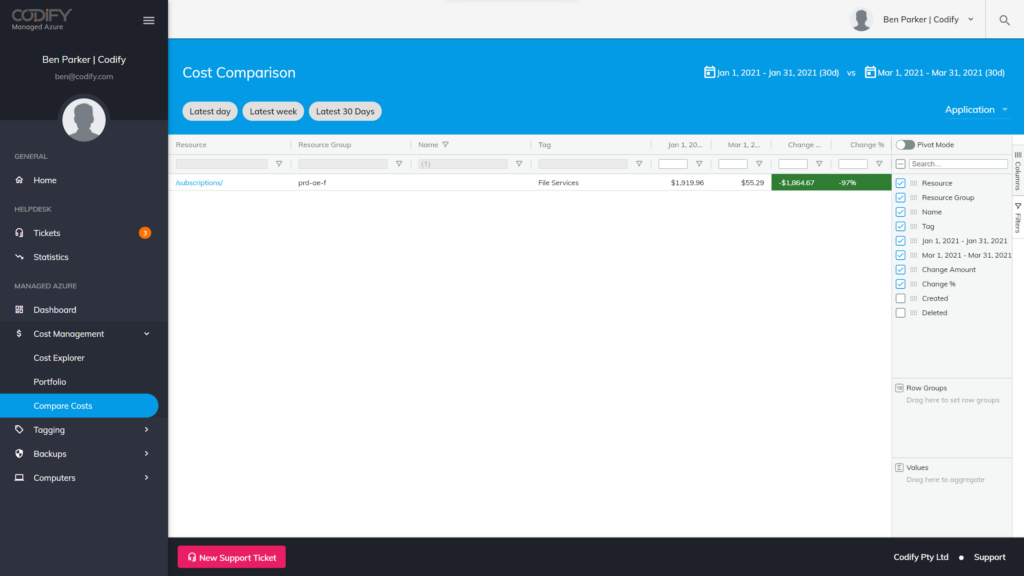
Tip #1 Delete Unattached Resources, including Disks and Public IPs
The longer you’ve been in Azure, the larger this problem might be – and the greater the savings can be for you. In a single month we identified 97 of these resources alone, and drove savings of $19,566 per month.
Unused resources like managed disks and public IPs don’t just cost you money. Left unchecked, they can pose a serious problem when staff move on and folk law prevents organisations from being able to clean up their environment.
- As you work towards cleaning up these resources, consider that:
Deleting a single item may have multiple moving pieces. If you delete a virtual machine (VM), for example, you may still need to identify and delete the disks, network interface, and any public IP addressing left behind. - It’s also a good idea to look for unused App Service Plans or other resources that are costing you money without actively contributing to your architecture.
- The Azure Portal can be helpful here, as you may be able to identify unattached resources by looking at properties on resources.
- You can find Public IPs without associations by adding a column to your view, as seen in the screenshot below.
- However when working with Manage Disks you should consider the Disk State, rather than the Managed By field, as there are platform rules that mean disks can be disconnected from a VM, yet still be in use. Take the example of disks that are replicated with Azure Site Recovery, the Disk State will be represented as ActiveSAS and the Managed By field will be empty.

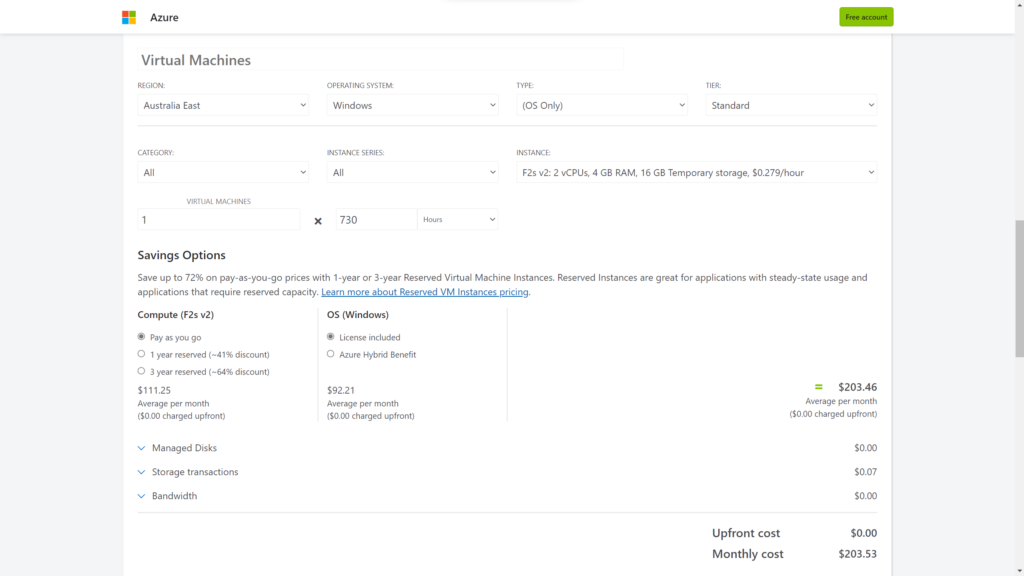
Tip #2 Use HUB to Reduce Licence Costs on VMs and Reassign for Maximum Utilisation
Azure Hybrid Use Benefit (HUB) appears in just about everyone’s Azure optimisation guide – yet we still see mistakes.
Many organisations have Software Assurance for their existing Windows and SQL environment which can be reused as a benefit to those customers
in Azure. Yet, the nature of this specific implementation can be difficult to navigate. To help you avoid common HUB mistakes, we’ll share both important
HUB background information, as well as a few things we keep in mind at Codify when planning a customer’s Azure Reference Architecture.
What you need to know about HUB
Generally speaking, Azure HUB provides a way to leverage existing licences which have current Software Assurance by utilising these licences in the
cloud. When utilised properly, HUB allows your organisation to exclude the cost of the Microsoft licensing component from certain workloads.
- Azure Hybrid Use Benefit for Windows removes the Windows operating system cost from Azure VMs. That means that the cost for the VM with Windows is the same as the VM for Linux.
- The benefit is applied to Azure based on a number of cores in the VM being licenced. Each two-processor on-prem licence entitles your organisation to 16 vCore licences in Azure. The minimum entry point for HUB is 16 Azure vCores, and these 16 vCores may be spread over two
Azure VMs. - Each additional eight vCores worth of on-prem licences may be applied to a single Azure VM in eight vCore blocks. Therefore, some care must be taken to ‘best fit’ your HUB to Azure.
Further, Windows Server Standard Edition processor licences and their HUB equivalents may not be used concurrently. Windows Server Datacentre Edition processor licences and their HUB equivalents, on the other hand, may be used concurrently.
Maximising the benefits of HUB
Often, we find that customers struggle to implement HUB in an effective and compliant way.
As an example, we were recently working with a customer that had identified an over commitment of 67 cores. This was primarily due to their application running on low-effective B-Series VMs. By optimising the placement of their HUB, we were able to get them to a compliant state and save them more money.
If you want to do something similar, we recommend that:
- Unless you have enough cores to cover all of your Azure environment, prioritise VMs with more CPUs (in groups of 8).
- For example, a D8as_v4 has 8 cores and would use the complete allocation of HUB, whereas a D2as_v4 only has 2 cores (which would leave you with 6 cores of HUB unutilised).
- Next, compare the savings per SKU size. With HUB, the savings is not the same across all SKUs. Check the saving per SKU, and ensure the ratio between sizes of the SKU stays the same).
- For instance, compare the savings on these two VMs, both with 2 cores:
- The savings on a B2s is $8.02, or 13%.
- Whereas the saving on a F2s_v2 is $92.21 and 45%.
Tip #3 Convert Premium SSDs to Standard SSDs, where possible
Once upon a time, using Premium SSDs was the only way to get an SLA from Microsoft for single VMs. But times have changed. You may not realise that now, Standard SSDs offer stable and consistent performance.
SLAs for single instance VMs are available now as well. In fact, you may have missed announcements from Microsoft suggest that they can deliver a performance burst for irregular maintenance or system activities, reducing the risk of compromise on this performance tier.
You can save 33% by switching from a Premium (P10) to a Standard (E10) SSD of 128 GB. We see this as the most commonly used disk size in our customer environments.
Tip #4 Move SQL Databases to Elastic Pools
If you find that you have multiple Azure SQL databases in your environment, consolidating them into one or more elastic pools can reduce costs while also giving you a central location for managing backups of databases.
Elastic pools allow you to share the compute and storage costs of Azure SQL across multiple databases, making it perfect for lowering costs in DevTest
environments. In fact, using this tip, we recently saved a customer $26,180 per month by shifting their SQL databases into a pool.

Tip #5 Retire Your App Service Environments (ASEs)
In the past, delivering web apps privately on your own network used to only be possible through App Service Environments (ASEs). ASEs provided
private, dedicated infrastructures that were broadly adopted whenever an application’s security required a network-as-a-perimeter model to secure
access to and from on-premises sources.
In the cloud, dedicated usually means expensive. The way ASEs have been priced in the past includes:
- Stamp fees, or monthly premiums for the use of an ASE (yes, with ASE v3, these fees have been removed, but we still think there’s a better way – keep reading for more)
- Compute fees, based on the amount of CPU/memory used by the ASE
Microsoft’s Azure Private Link is the new architectural standard for managing network-as-a-perimeter, and it can be used with the newly released App
Service v3, as well as many other Azure Platform-as-a-Service offerings.
We’ve helped customers move to this new architectural pattern from costly ASEs in order to realise a savings of $5,145 per month – but making the switch isn’t as simple as the click of a button.
To take advantage of Private Link, you’ll need to re-deploy your web apps from the ASE into an App Service Plan v3. Depending on how many apps you need to re-deploy – and how mature your DevOps process is – this might seem like an insurmountable project. If that’s the case, investing in a DevOps CI/CD strategy may be best.
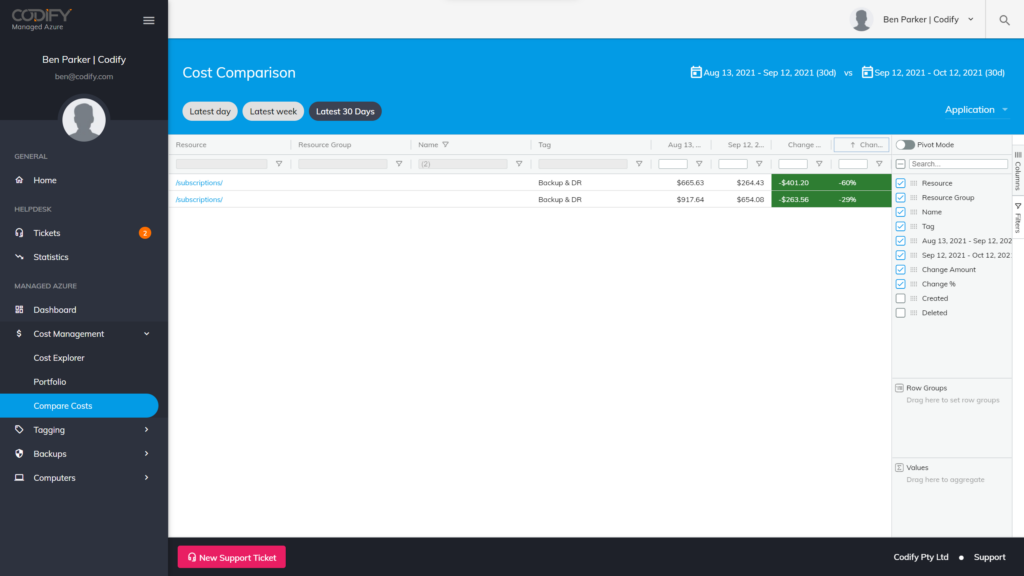
Tip #6 Review Your Backups and Delete Items that are No Longer Required
Cloud backup and disaster recovery (DR) is a common first workload for customers as they start their journey with Azure. It’s a good choice, as Azure Backup provides a consumption-based offering that’s securely hosted by Microsoft – using it means getting to rest comfortably knowing that your data
is backed up and inaccessible to hackers who might penetrate your network and hold you to ransom with a crypto-locker.
Azure Backup now supports Archive Tier storage on long-term retention, making it even more cost-efficient. In some cases, this change may lower the cost of holding backups by 90%.
But don’t just rely on changes like these to optimise your costs. It’s also a good idea to review your backup usage at the same time. As Backup is a consumption-based offering, ‘tuning’ your usage can result in significant savings. A few steps we recommend taking include:
- Deleting backup items that are no longer required. For instance, when a VMs is deleted, Azure Backup will maintain at least one backup until the backup itself is deleted, which could increase your costs.
- Those that you can’t delete should be move to Archive tier. Optimise your retention periods:
- Daily: Azure’s default backup policy is 30 days; you can safely lower this in your DevTest environments (and, in some cases, your Production servers as well)
- Weekly: Enable this to achieve a longer retention period with fewer recovery points, which will lower your storage utilisation.
- Monthly and Yearly: Consider which of your servers, if any, need to have long-term retention. For those that do, move them into a policy with monthly and/or yearly retention periods set to meet your recovery objectives.
Tip #7 Review your SQL Backup Items and Delete those that are No Longer Required
This recommendation is basically the same as Tip #6 above, but it focuses instead on SQL databases on the Azure SQL Platform-as-a-Service offering. Because, again, this is a consumption-based solution, we recommend taking the following steps to optimise your costs:
- Configure Point-in-Time-Recovery (PITR) for short-term retention.
- It isn’t uncommon to see PITR backups on data warehouses costing significant money, due to ETL processes that delete existing data and reload it from a source system.
- Generally speaking, the use cases for backups in this scenario are limited, which is why PITR can be lowered to 1 day (the system’s minimum).
- Making the move to Azure Synapse and Fabric should also feature on your roadmap.
Optimise the retention periods for other SQL databases:
- Daily: Here, again, the default backup policy is 30 days, which you can safely lower for DevTest environments and some production servers.
- Weekly: Lower your storage utilisation here through longer retention periods with fewer recovery points.
- Monthly and Yearly: If any of your databases need long-term retention, move them into a policy that supports your recovery objectives.

Tip #8 Review Storage Account Tiers for Big Blob Storage Containers and File Shares
For many organisations, the demand for data is never-ending. That’s why any strategy you implement for holding large amounts of data needs to include the use of archive platforms.
Switching from hot to archive tiers can reduce the costs associated with holding data for the long term. The key is to find data that’s written once and then accessed infrequently. That’s because switching to archive tiers can lower the cost per GB of storing the data in the cloud, but it may also introduce fees for accessing that same data.
As an example of what this looks like in practice, we recently worked with a Local Council that has a legal obligation to maintain body-cam footage from its rangers, as well as environmental footage from pipe and sewer inspections, for long periods of time.
Because the footage wouldn’t need to be accessed frequently, the Council was an ideal candidate for switching to an archive tier – they were able to save 90% on their storage costs by making the transition.